 Add Standard Detail ( Drawing Editor > s a )
Tool summary :
Also see :
- Drawing Editor (where Add Standard Detail is a tool)
- Unshorten (before performing this operation)
- Layer Panel (selects layer for adding the standard detail)
- Verify Reference Point (resets insertion point of standard detail)
- Save Standard Detail (to save a standard detail so it can be added)
- Paste Special (alternative to Add Standard Detail )
- Undo (undoes Add Standard Detail )
 Quick instructions (also see the detailed instructions ) :

|
1 . Invoke Add Standard Detail . |

|
2 . Double-click the standard detail that you want to add. |
|
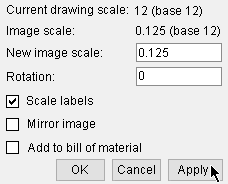
3 . Optionally change the preview image's scale, rotation or etc. Tab or " Apply " applies the " New image scale " or " Rotation " or " Scale labels " or " Mirror image " to the preview image, which is shown on screen. |
|
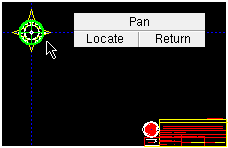
4 . Left-click ( Locate ) to place a copy of the drawing. |
|
5 . Optionally repeat steps 3 and 4 to place additional copies of the drawing. Right-click ( Return ) when you are done. |
 Detailed instructions (also see the example ) :
The following instructions assume that you are using a 3-button mouse. Tip: You can Undo while still adding images during Add Standard Detail .
1a : (optional) : On the standard detail or submaterial you want to add to your current drawing, check the box for " Freeze label " on each extension dimension on that drawing (or check the box for " Freeze all dimension labels ") if you want to retain the " Label text " reported for those extension dimensions.
1b : On the Layer Panel, select the layer that you want to add the standard detail or submaterial detail to.
1c (if applicable) : You should Unshorten a member detail before beginning if you want Detail Members to later be able to correctly preserve ' User-created ' annotations. For best accuracy in any type of Drawing Editor drawing, measurement tools such as Dimension Add or Ruler or Construction Line Add using BSCL reliably produce precise and consistent results in an unshortened drawing.
2 . Invoke Add Standard Detail using any one (1) of the following methods:
▸ Click the Add Standard Detail icon. The icon can be taken from the group named ' File ' and placed on the ribbon.
▸ Add Standard Detail can also be invoked using a keyboard shortcut , the context menu , or a mode . For the ' Lightning ' layout style, configuration of the interface is done using Customize Interface .
3 . A drawing selection window opens.
|
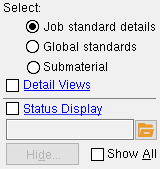
The check box " Detail Views " can show or hide available detail views that are under the drawing type category '
" Status Display " and " Hide ... " and " Show All " also let you adjust the selection set that is listed when ' |
3a : Select the drawing type ('
Job standard details ' or '
Global standards ' or '
Submaterial ') that you want to be listed in the window.
3b : Double-click the name of the drawing you want (or select it, then press " OK ").
4 . A preview image of the standard detail you selected in step 3 appears on screen along with the Add Standard Detail window. Go to step 5 if you find the preview image acceptable; to adjust the preview image, do step 4a.
4a (optional) : On the Add Standard Detail window, enter the settings that you want applied to the preview image that is shown on screen.
Tip: Use Tab to move forward or Shift + Tab to move backward from one widget to the next (or previous). As you Tab out of " New image scale " or " Rotation " or " Scale labels " or " Mirror image ," any change you made is automatically applied to the preview image.
5 (or go to step 6) : Locate- Pan -Return mouse bindings become active along with various Locate options. The image shown on screen is a preview (except for color) of how the image will look when located.
|
|
|
bindings |
5a (optional) : Select the Locate option that you want (if it's not selected already).
5b : Place your mouse pointer (
) so that the point location target snaps to the on-screen location where you want the preview image to be placed, then left-click ( Locate ).
6 . A copy of the preview image is placed where you located it, and a new preview image appears on screen. Locate- Pan -Return mouse bindings continue to be active. The Add Standard Detail window is again active.
6a (optional) : Repeat step 5 (and optionally step 4) as many times as you like to place additional copies of the preview image.
6b : Right-click ( Return ) when you are done. Alternative: " Cancel " also ends the operation.
7 . The mouse bindings that were active before you invoked Add Standard Detail are again active.
Tip: Any copies of the standard detail located using this procedure can be instantly removed (one at a time, in reverse-order of their addition) by using Undo . You can even Undo while still adding images.
 The Add Standard Detail window :


bindings
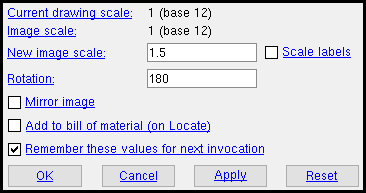
Current drawing scale: Read-only . This tells you the scale of the drawing you are importing the image to. In other words, this is the scale of your current drawing.
Image scale: read-only . This tells you the scale of the drawing you are placing copies of. That drawing is selected in step 3 .
New image scale (Base 12 or Base 10) : The scale you want applied to the standard detail or submaterial you are adding. The scale is immediately applied to the preview image (when you press Tab or " Apply "). To locate the preview image, left-click ( Locate ) as described in step 5 .
(Base 12) means imperial dimensioning is being used. Enter the number of inches on your current drawing that you want to represent 1 foot in the shop or construction site.
(Base 10) means metric dimensioning is being used. Enter the number of millimeters on your current drawing that you want to represent 10 mm on the actual materials.
Objects not affected by " New image scale ": The sizes of labels , piecemarks , section sizes , pointer arrowheads , dimension terminals (
) and workpoint symbols are independent of the " New image scale ." The sizes of labels and dimension labels can be changed using "
Scale labels " (below) or on their edit windows. Other objects that are independent of scaling can also be resized using their edit windows.
Tip: You may want to make the " New image scale " match the " Current drawing scale ." Note that if you enter a new scale here, you may optionally choose to " Scale labels ." For more information, see " Drawing scale ."
Defaults: The next time you do an entirely new Add Standard Detail operation, the " New image scale " defaults to the " Image scale ." You can, however, use " Remember these values " (followed by " Apply " or " OK ") to apply this scale to each copy of the image you locate during the current operation.
Scale labels: ![]() or
or ![]() . This applies only if you changed the " New image scale ." The scale is applied to the preview image immediately (when you press Tab or " Apply "). To locate the preview image, left-click ( Locate ) as described in step 5 .
. This applies only if you changed the " New image scale ." The scale is applied to the preview image immediately (when you press Tab or " Apply "). To locate the preview image, left-click ( Locate ) as described in step 5 .
If this box is checked (
), the labels and dimension labels on the preview image are scaled per the " New image scale ." The label " Font size " and dimension label " Font size " reported on the located objects' edit windows will be changed in correlation with the new scale.
If the box is not checked (
), the labels on the preview image remain at the " Image scale ."
Rotation: Any positive or negative (-) angle from 360 to -360 degrees. The rotation is applied to the preview image immediately (when you press Tab or " Apply "). To locate the preview image, left-click ( Locate ) as described in step 5 .
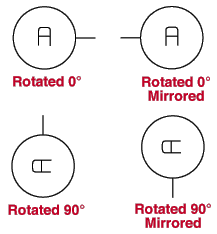
' 0 ' (zero) reverts the preview image to its rotation in its drawing file. In other words, the preview image keeps the rotation it had when it first appeared in step 4 .
A ' positive number ' rotates the preview image counterclockwise that number of degrees.
A ' negative (-) number ' rotates the preview image clockwise that number of degrees.

If this box is checked (
), the preview image is made a mirror image of itself. A mirror image is one in which right and left are reversed.
If the box is not checked (
), the preview image remains oriented the same way that it is oriented in its actual drawing file (as it first appeared in step 4 ).
Defaults: The next time you do an entirely new Add Standard Detail operation, " Mirror image " defaults to off (not checked). You can, however, use " Remember these values " (followed by " Apply " or " OK ") to mirror each copy of the drawing you locate during the current operation.
Add to bill of material (on Locate) : ![]() or
or ![]() . This is for adding bill info to a member detail or detail sheet. It does not appear as an option if your current drawing is something other than a member detail or detail sheet. On a member detail or detail sheet, this is disabled (grayed out) if there is no bill information in the standard detail. Only the lines after line 1 in the standard detail are copied.
. This is for adding bill info to a member detail or detail sheet. It does not appear as an option if your current drawing is something other than a member detail or detail sheet. On a member detail or detail sheet, this is disabled (grayed out) if there is no bill information in the standard detail. Only the lines after line 1 in the standard detail are copied.
If this box is checked (
), the bill information associated with the drawing selected in step 3 will be merged with the bill of material of your current drawing when you left-click ( Locate ) in step 5 . The imported bill information is placed into your current drawings's bill after all other materials and before field bolts. If you locate multiple copies of the same standard detail, the bill quantity is increased (new lines are not added). To review this bill of material information, use Edit Bill .
If the box is not checked (
), the bill information associated with the located image does not get merged with the bill of material of your current drawing.
Remember these values for next invocation: ![]() or
or ![]() . This affects whether or not the settings on this window are remembered during your current Add Standard Detail operation. For the next Add Standard Detail operation, it affects whether or not all settings except " Mirror image " or " New image scale " are remembered.
. This affects whether or not the settings on this window are remembered during your current Add Standard Detail operation. For the next Add Standard Detail operation, it affects whether or not all settings except " Mirror image " or " New image scale " are remembered.
If this box is checked (
) and you press " Apply " or " OK ," all settings on this window will be remembered when this window opens again after you left-click ( Loca te ) the preview image. The settings (except " Mirror image " or " New image scale ") will also be remembered when the next Add Standard Detail operation starts.
If the box is not checked (
) and you press " Apply " or " OK ," the settings on this window will, after you left-click ( Locate ) the preview image, revert to the basic default settings . If you end this operation, the next Add Standard Detail operation starts with the basic default settings.
-------------------------
"OK" (or the Enter key) closes this window, but does not end the operation. The preview image remains on screen, and Locate- Pan -Return mouse bindings are active. Step 5 explains how to left-click ( Locate ) the preview image. Step 6 explains how to right-click ( Return ) to end this operation.
Note 1: You do not have to close this window in order to proceed with the operation. You can left-click ( Locate ) the preview image with the window still open. You can also right-click ( Return ) with the window still open.
Note 2: With respect to " Remember these values ," " OK " works the same way as " Apply ." See the discussion about defaults under " Apply ."
Tip: You can Undo to remove images that you have located.
"Cancel" (or the Esc key or the ![]() button) closes this window and ends the Add Standard Detail operation.
button) closes this window and ends the Add Standard Detail operation.
Note: Instead of hitting " Cancel ," you can right-click ( Return ) to end the operation.
"Apply" updates the preview image with the current setting for the field that you are in (" New image scale " or " Rotation " or etc.) without your having to Tab out of that field.
Defaults for your current Add Standard Detail operation: If you press " Apply " (or " OK ") and " Remember these values " is checked, all of the current settings will be retained on the Add Standard Detail window after you left-click ( Locate ) the preview image.
Defaults for your current Drawing Editor session: If you press " Apply " (or " OK ") and " Remember these values " is checked and then you end this operation, the current settings except " Mirror image " and " New image scale " will be retained for the next Add Standard Detail operation.
" Reset " reverts the settings on the Add Standard Detail window back to the basic default settings that apply when Add Standard Detail is first invoked during a new session in the Drawing Editor .
Basic default settings: " New image scale " is made to match the " Image scale ." " Rotation " is set to ' 0 '. " Mirror image " and " Remember these values " are unchecked. " Add to bill of material " is checked if the standard detail includes bill information and the drawing you are adding it to is a member detail or detail sheet.
